AzureCLI では1つのサブスクリプションが選択された状態での操作しか対応していません。
なので複数のサブスクリプションを利用している場合には、ログイン後にデフォルトで選択されるサブスクリプションがリソースを作成したいサブスクリプションなのかを気にする必要があります。
今回は、AzureCLIでサブスクリプションの変更コマンドを実際に試してみました。
サブスクリプションの変更方法
以下のコマンドで変更可能です。
IDを指定する方法とサブスクリプション名を指定する方法の2つがあります。
#サブスクリプションIDを指定
az account set -s <サブスクリプションID>

#サブスクリプション名を指定
az account set -n <サブスクリプション名>
・記載例
#サブスクリプションIDを指定
az account set -s "12345678-1234-1234-1234-123456789012"

#サブスクリプション名を指定
az account set -n "TestSub02"
実際に変更してみます。
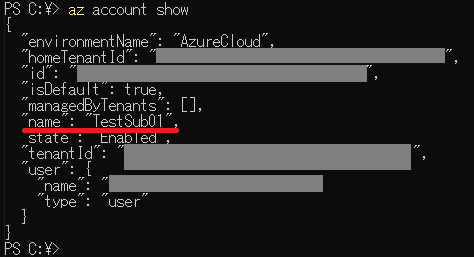
・現状のサブスクリプションを確認する(az account show)

・サブスクリプションを変更する(az account set)
サブスクリプション名やIDの取得方法は下部のサブスクリプション情報の確認方法を参照ください。
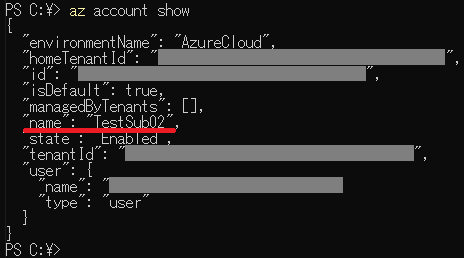
今回はサブスクリプション名で

・変更されたかを確認する(az account show)

これでサブスクリプションの変更は完了です。
サブスクリプション情報の確認方法
以下のコマンドで複数のサブスクリプションの情報を取得することができます。
az account list出力としては以下のような形になります。
[isDefault] の項目が [true] になっているサブスクリプションが現状選択されているサブスクリプションです。
C:\>az account list
[
  {
    "cloudName": "AzureCloud",
    "homeTenantId": "xxxxxxxx-xxxx-xxxx-xxxx-xxxxxxxxxxxx",
    "id": "yyyyyyyy-xxxx-xxxx-xxxx-xxxxxxxxxxxx",
    "isDefault": true,
    "managedByTenants": [],
    "name": "TestSub01",
    "state": "Enabled",
    "tenantId": "xxxxxxxx-xxxx-xxxx-xxxx-xxxxxxxxxxxx",
    "user": {
      "name": "xxxxxxxxxx@xxxxxxxxxxxxxxxxx.onmicrosoft.com",
      "type": "user"
    }
  },
  {
    "cloudName": "AzureCloud",
    "homeTenantId": "xxxxxxxx-xxxx-xxxx-xxxx-xxxxxxxxxxxx",
    "id": "zzzzzzzz-xxxx-xxxx-xxxx-xxxxxxxxxxxx",
    "isDefault": false,
    "managedByTenants": [],
    "name": "TestSub02",
    "state": "Enabled",
    "tenantId": "xxxxxxxx-xxxx-xxxx-xxxx-xxxxxxxxxxxx",
    "user": {
      "name": "xxxxxxxxxx@xxxxxxxxxxxxxxxxx.onmicrosoft.com",
      "type": "user"
    }
  }
]

C:\>
似たようなコマンドとして [az account show] もありますが、これは現状選択されているサブスクリプションの情報を表示するコマンドになります。
なので、変更したいサブスクリプションの情報を確認するためには [az account list] を利用する必要があるので使い分けに少し注意が必要です。


コメント